Overview
To accurately calculate sales tax for all of your Checkout Champ transactions, follow this guide to install and configure the Zamp integration.Prerequisites
To install the Zamp Plugin, you will need access to:Installation Process
Installing the Zamp Plugin
1
Log into your Checkout Champ Dashboard
2
Navigating to Checkout Champ Admin
3
Installing the Zamp plugin
Under Admin, click Plugins, search for Zamp, and click Activate
4
Configure the Zamp Plugin
- Under apiKey, enter your sandbox key
- Under FriendlyName, enter as <Your Business Name> - Sandbox
- Check sendTransactions
- Check calculateShippingTax
- Hit Connect
5
Mapping Products
To accurately calculate tax for your inventory, it is important to map your items to Zamp’s Product Tax Codes. Zamp’s tax codes can be found here, but talk to your Zamp Representative if you have any questions. We are here to assist in evaluating the taxability of your inventory.1
Navigate to your product list
Under CRM, click Products
2
Pick your product
3
Map the tax code
- Within your product, find the Tax Code box
- Enter the applicable Zamp tax code
- Save with Update Product
Enabling Tax Calculation for Campaigns
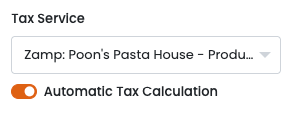
Zamp will appear under Tax Service for any campaigns you create.- Ensure that you’re selecting Zamp: <Your Business Name> - Production for any campaigns Tax Service so Zamp calculates tax and posts transactions on your behalf.
- Ensure Automatic Tax Calculation is toggled.
There is no action required within the Sales Tax options within the campaign you are editing.