

Overview
These guides will walk you through how to install the Zamp Sales Tax bundle in your NetSuite instance, depending on your existing set-up. It can directly be installed from either your Sandbox or Production account through the SuiteBundler. We recommend you install and test in your Sandbox before posting live transactions.Types of Set-ups
- Standard (SuiteTax Disabled)
- SuiteTax Enabled
Confirming SuiteTax or Standard Tax
1
Find SuiteTax Configuration
- Hover over Setup on your center tab
- Hover over Company
- Hover over Enable Features
- Click Tax
2
Confirm if Suitetax is enabled or disabled
Installing The Bundle
The below steps are valid for BOTH Standard and SuiteTax enabled set-ups. Once the bundle is installed, and API keys are saved, proceed to the Zamp SuiteBundle Configuration pages for your respective set-up.1
Finding the Zamp SuiteBundle
- In your center tab, hover over Customization
- Hover over SuiteBundler
- Click Search & Install Bundles
- Search for Zamp Sales Tax
2
Installing the Bundle
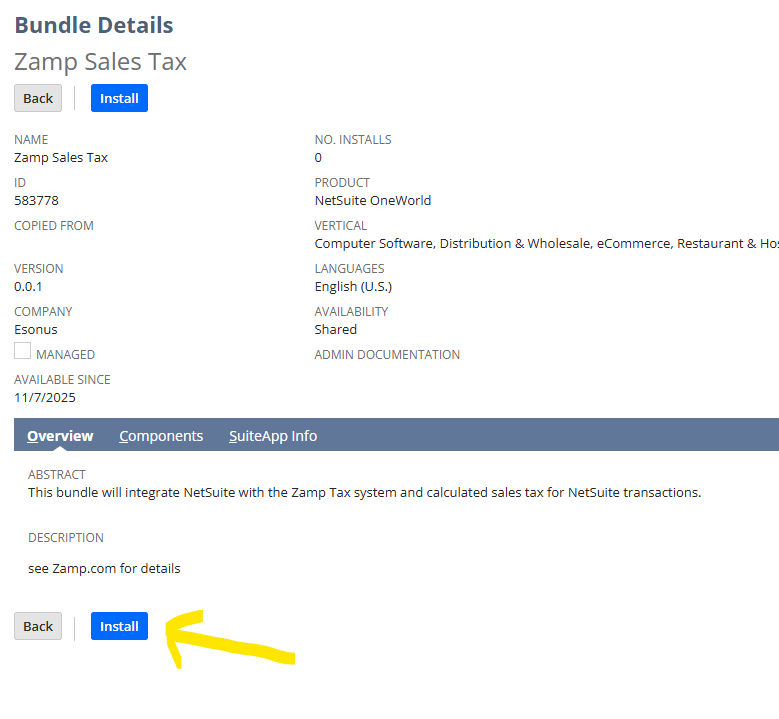
- Click Install
- Review the bundle Components to ensure you are aware of what is being installed
- When ready, click Install Bundle
- This will likely take a few minutes. Periodically refresh the page until the status displays a green checkmark, indicating the installation is finished.
Zamp Settings for Netsuite
When installing the Zamp bundle, we will generate a settings form to enable Zamp functionality.1
Navigate to the Zamp Settings Form
Within the global search bar, search for New Zamp | Settings
2
Configuring the Form and Enabling Settings
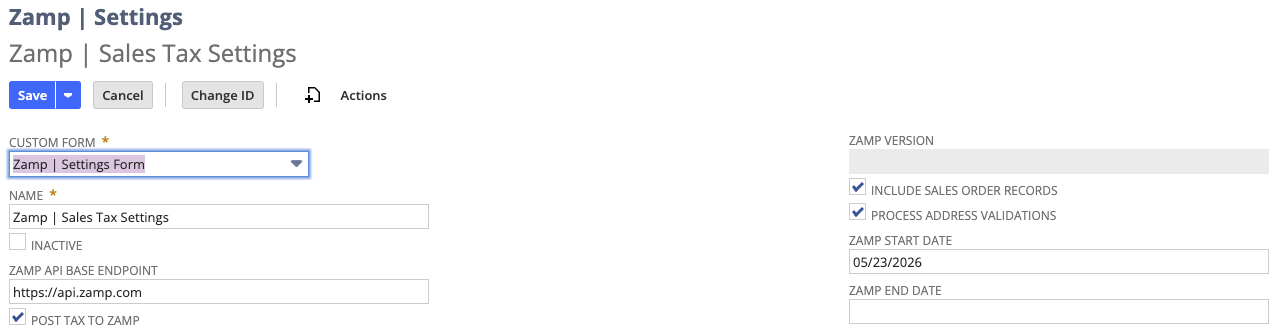
- Once a new Zamp Settings Form has appeared, enter the following values:
- Name: Zamp | Sales Tax Settings
- Zamp API Base Endpoint: https://api.zamp.com
- Ensure all the checkboxes are checked 1.
3
Configuring a Start Date
If you are concerned regarding any potential Zamp calculations overriding original tax amounts (very low risk of this), you can set a Zamp Start Date which will force Zamp to never override tax amounts before that date
Setting up Your API Key(s)
Production
1
Finding Secrets in NetSuite
- Within your global search bar, look for Setup > Company > API Secrets
2
Configuring the Production Key
- Click Create New
- Enter the following values:
- Name: Zamp API Key
- ID: _zmp_api_secret
- DO NOT DEVIATE FROM THE ABOVE FORMAT
- Password: <Copy-Paste in your API Key>
- Confirm Password: <Copy-Paste in your API Key>
- (Optional) Description: You can choose to enter the first ~10 digits of your API key for future reference
- Click Save
3
Confirming Restrictions
- Navigate to the Restrictions tab of the record and check the following boxes:
- Allow for all Scripts
- Allow for all Domains
Sandbox
1
Configuring the Sandbox Key
- Click Create New
- Enter the following values:
- Name: Sandbox Zamp API Key
- ID: _sandbox_zmp_api_secret
- DO NOT DEVIATE FROM THE ABOVE FORMAT
- Password: <Copy-Paste in your Sandbox API Key>
- Confirm Password: <Copy-Paste in your Sandbox API Key>
- (Optional) Description: You can choose to enter the first ~10 digits of your API key for future reference
- Click Save
2
Confirming Restrictions
- Navigate to the Restrictions tab of the record and check the following boxes:
- Allow for all Scripts
- Allow for all Domains
Syncing Product Tax Codes
To pull in the roster of Zamp’s 160+ Product Tax Codes, we will run a script to confirm the API key is active.1
Accessing the Script
- Look for Upsert Zamp Item Tax Codes in your global search bar
- You don’t need to create a new script
- Click View
- Click Edit
2
Running the Script
- You can choose to schedule the script to run periodically, or just run it on demand. For set-up, you will need to run the script
- Under the Save option, Click Save and Execute
- Typical runtimes are under 5 minutes, but look for Running Process to confirm there are no errors
- To confirm the codes were pulled in as expected, search for Zamp Product Tax Codes
- A list of codes identical to the ones on this page should appear