> ## Documentation Index
> Fetch the complete documentation index at: https://developer.zamp.com/llms.txt
> Use this file to discover all available pages before exploring further.
# Installation Guide
> Learn how to install the Zamp application on your QuickBooks Account.
# Overview
If you are ready to start leveraging Zamp in your QuickBooks, follow the below steps to install and configure the Zamp application within QuickBooks.
1. QuickBooks Online
2. An eligible account tier: Simple Start, Essentials, Plus, Advanced, or Accountant
3. A Zamp account and a Zamp API Token
# Prerequisites
| **Item** | Where to Obtain |
| --------------------------------------------------------------------------------- | --------------------------------------------------------------------------------------------------------------------------- |
| An eligible account tier: Simple Start, Essentials, Plus, Advanced, or Accountant | Confirm which version of Quickbooks you have, through the **Subscriptions and billing** section of your Quickbooks settings |
| Your Zamp API Key for Sandbox or Production | The **Integrations** page within your Zamp account, or your Zamp representative |
# Installation Guide
1. Install the **Zamp Tax** application for QuickBooks Online from the QuickBooks Online Marketplace.
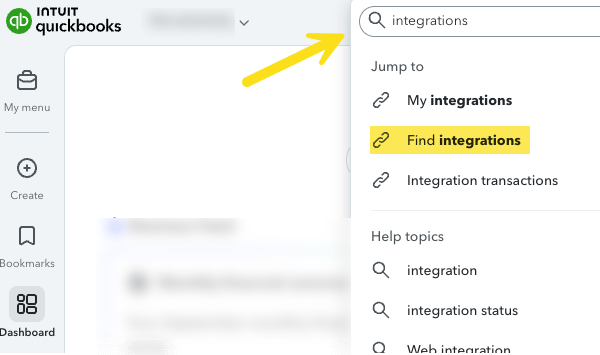
2. If you're using the new, modernized QuickBooks Online view or user interface, the [Zamp Tax app](https://qbo.intuit.com/app/qboAppCard?shortName=zamptax\&queryID=8e456ca7c47f76ba4afbfc83668e1f80) can be found by going to **Search** (at the top of the page) **Find** **Integrations** **searching** for **Zamp**.
3. Navigate to **My Integrations** through the search bar, or through the icon at the top right of the screen.
4. Select **Launch** under **Zamp Tax**. You will be authenticated and taken to the Zamp Tax app's configuration and settings page.
## Application Download and Installation
Zamp will create a **Sales Tax Payable** account within your Chart of Accounts during installation. If you are at the limit for your Quickbooks tier (Check Usage Limits [here](https://quickbooks.intuit.com/learn-support/en-us/help-article/intuit-subscriptions/learn-usage-limits-quickbooks-online/L6THMltE4_US_en_US)), installation will fail. Ensure you have at least one remaining spot for the Zamp account.
1. Navigate to the Quickbooks Marketplace, or going to **Search** (at the top of the page) **Find** **Integrations** **searching** for **Zamp**.
2.
 1. Navigate to **My Integrations** through the search bar, or through the icon at the top right of the screen.
2. Select **Launch** under **Zamp Tax**. You will be authenticated and taken to the Zamp Tax app's configuration and settings page.
1. Your user will be assigned **Admin** of the application when opening. This can be re-assigned at anytime
3. The Zamp Tax Application will open in a new tab of your browser
1. Navigate to **My Integrations** through the search bar, or through the icon at the top right of the screen.
2. Select **Launch** under **Zamp Tax**. You will be authenticated and taken to the Zamp Tax app's configuration and settings page.
1. Your user will be assigned **Admin** of the application when opening. This can be re-assigned at anytime
3. The Zamp Tax Application will open in a new tab of your browser
 ## Setting Configuration
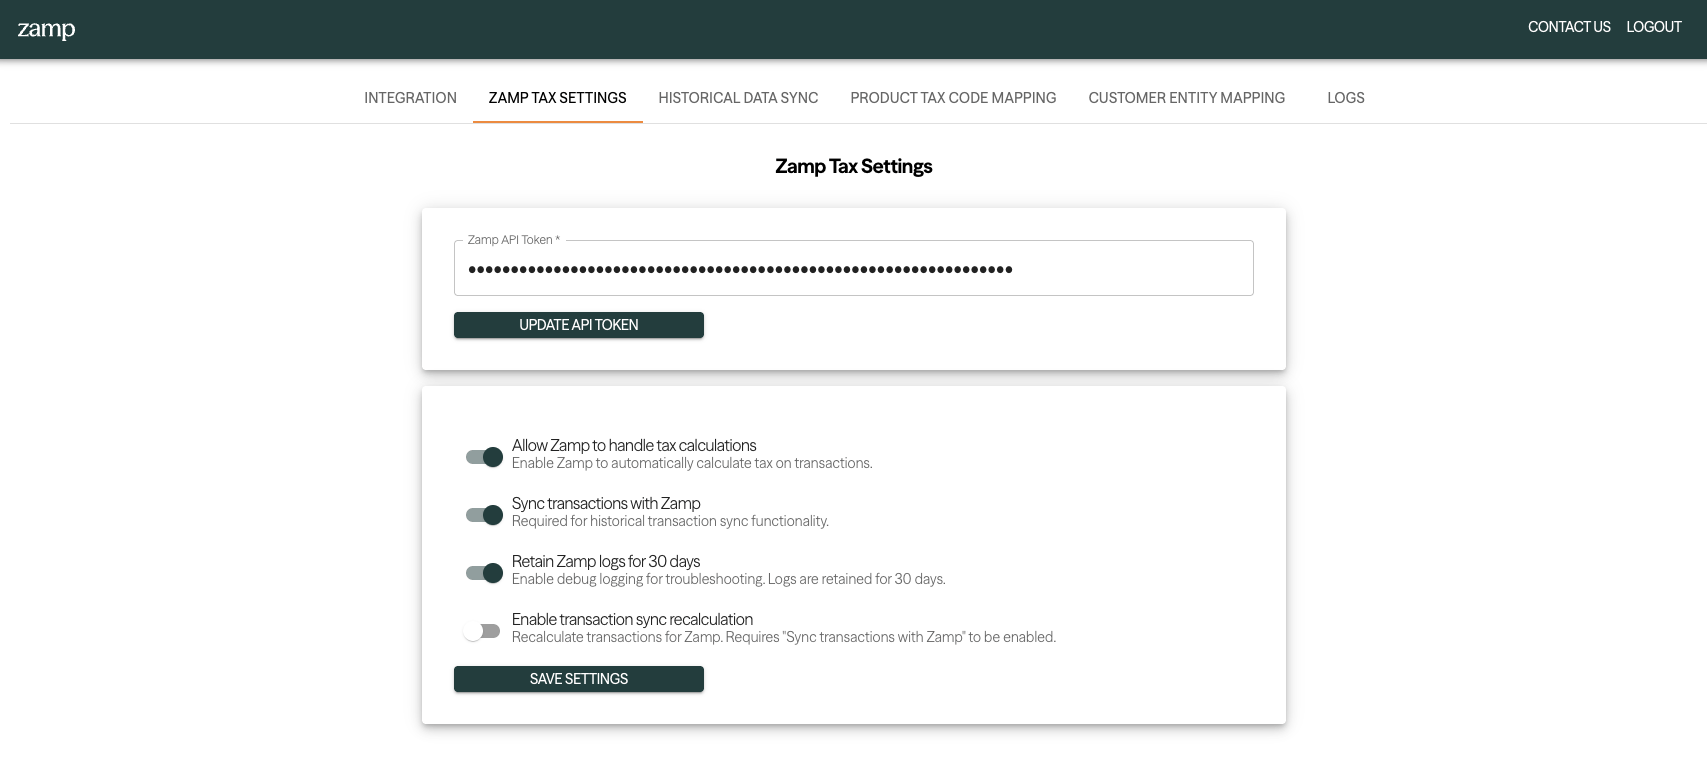
1. Enter your Zamp API token under **Zamp API Token \***
2. Save by pressing **Update API Token**
1. **Allow Zamp to handle tax calculations**
1. Enable this option to have Zamp handle sales tax calculations for your invoices, recurring invoices, and sales receipts.
2. **Sync transactions with Zamp**
1. Enable this option to send your invoices, recurring invoices, credit memos, and sales receipts automatically to Zamp for sales tax filing purposes.
3. **Retain Zamp logs for 30 days**
1. Enable this option to keep your logs (under the **Logs** navigation item) saved for 30 days. This can be helpful for our support team should you have questions.
4. **Enable transaction sync recalculation**
1. This determines if you would like Zamp to recalculate taxes on your historical transactions. This is an optional setting.
## Setting Configuration
1. Enter your Zamp API token under **Zamp API Token \***
2. Save by pressing **Update API Token**
1. **Allow Zamp to handle tax calculations**
1. Enable this option to have Zamp handle sales tax calculations for your invoices, recurring invoices, and sales receipts.
2. **Sync transactions with Zamp**
1. Enable this option to send your invoices, recurring invoices, credit memos, and sales receipts automatically to Zamp for sales tax filing purposes.
3. **Retain Zamp logs for 30 days**
1. Enable this option to keep your logs (under the **Logs** navigation item) saved for 30 days. This can be helpful for our support team should you have questions.
4. **Enable transaction sync recalculation**
1. This determines if you would like Zamp to recalculate taxes on your historical transactions. This is an optional setting.