> ## Documentation Index
> Fetch the complete documentation index at: https://developer.zamp.com/llms.txt
> Use this file to discover all available pages before exploring further.
# Bundle Installation Guide
> Learn how to install the Zamp bundle for your SuiteTax or non-SuiteTax NetSuite account.
# Overview
These guides will walk you through how to install the Zamp Sales Tax bundle in your NetSuite instance, depending on your existing set-up. It can directly be installed from either your Sandbox or Production account through the SuiteBundler. We recommend you install and test in your Sandbox before posting live transactions.
**Read before starting installation:**
The current set-up in your NetSuite will determine which installation path you take. Ensure you understand which set-up your currently have before installing the Zamp bundle.
# Types of Set-ups
1. Standard (SuiteTax Disabled)
2. SuiteTax Enabled
## Confirming SuiteTax or Standard Tax
1. Hover over **Setup** on your center tab
2. Hover over **Company**
3. Hover over **Enable Features**
4. Click **Tax**
 # Installing The Bundle
The below steps are valid for **BOTH** Standard and SuiteTax enabled set-ups. Once the bundle is installed, and API keys are saved, proceed to the **Zamp SuiteBundle Configuration** pages for your respective set-up.
1. In your center tab, hover over **Customization**
2. Hover over **SuiteBundler**
3. Click **Search & Install Bundles**
4. Search for **Zamp Sales Tax**
# Installing The Bundle
The below steps are valid for **BOTH** Standard and SuiteTax enabled set-ups. Once the bundle is installed, and API keys are saved, proceed to the **Zamp SuiteBundle Configuration** pages for your respective set-up.
1. In your center tab, hover over **Customization**
2. Hover over **SuiteBundler**
3. Click **Search & Install Bundles**
4. Search for **Zamp Sales Tax**
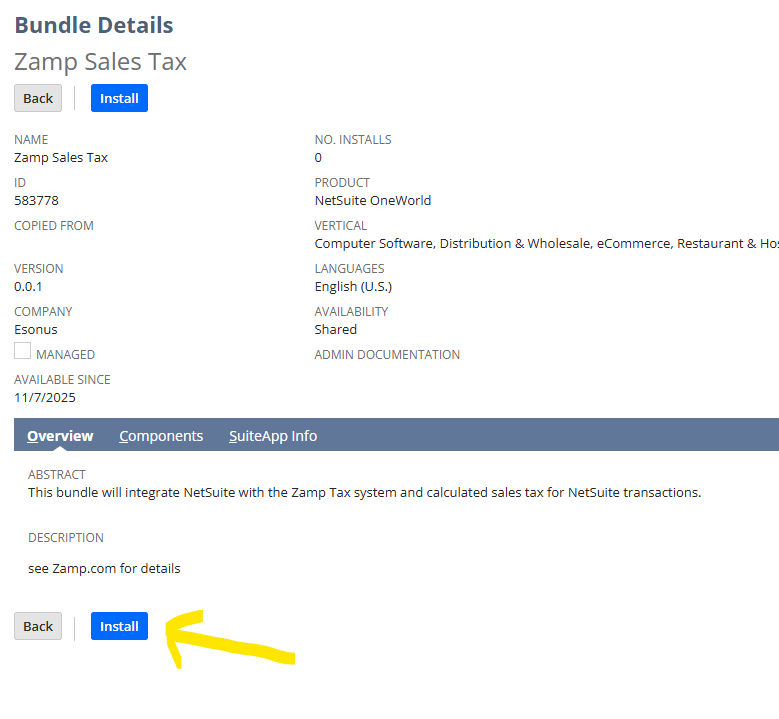 1. Click **Install**
2. Review the bundle **Components** to ensure you are aware of what is being installed
3. When ready, click **Install Bundle**
4. This will likely take a few minutes. Periodically refresh the page until the status displays a green checkmark, indicating the installation is finished.
## Zamp Settings for Netsuite
When installing the Zamp bundle, we will generate a settings form to enable Zamp functionality.
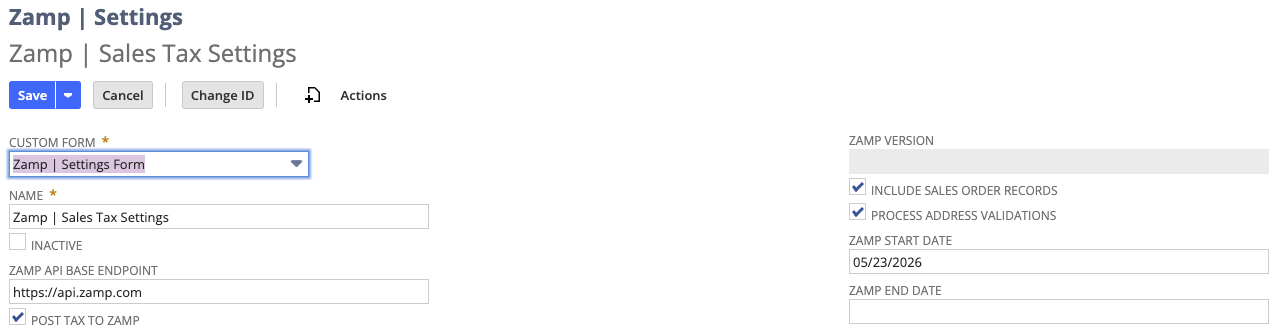
Within the global search bar, search for **New Zamp | Settings**
1. Once a new Zamp Settings Form has appeared, enter the following values:
1. Name: **Zamp | Sales Tax Settings**
2. Zamp API Base Endpoint: [**https://api.zamp.com**](https://api.zamp.com)
2. Ensure all the checkboxes are checked 1.
1. Click **Install**
2. Review the bundle **Components** to ensure you are aware of what is being installed
3. When ready, click **Install Bundle**
4. This will likely take a few minutes. Periodically refresh the page until the status displays a green checkmark, indicating the installation is finished.
## Zamp Settings for Netsuite
When installing the Zamp bundle, we will generate a settings form to enable Zamp functionality.
Within the global search bar, search for **New Zamp | Settings**
1. Once a new Zamp Settings Form has appeared, enter the following values:
1. Name: **Zamp | Sales Tax Settings**
2. Zamp API Base Endpoint: [**https://api.zamp.com**](https://api.zamp.com)
2. Ensure all the checkboxes are checked 1.
 This step is likely required if SuiteTax is enabled. For standard users, this is an optional step.
If you are concerned regarding any potential Zamp calculations overriding original tax amounts (very low risk of this), you can set a **Zamp Start Date** which will force Zamp to never override tax amounts before that date
## Setting up Your API Key(s)
### Production
1. Within your global search bar, look for **Setup > Company > API Secrets**
1. Click **Create New**
2. Enter the following values:
1. Name: **Zamp API Key**
2. ID: ***\_zmp\_api\_secret***
1. DO NOT DEVIATE FROM THE ABOVE FORMAT
3. Password: **\**
4. Confirm Password: **\**
5. (Optional) Description: You can choose to enter the first \~10 digits of your API key for future reference
3. Click **Save**
1. Navigate to the **Restrictions** tab of the record and check the following boxes:
1. **Allow for all Scripts**
2. **Allow for all Domains**
### Sandbox
1. Click **Create New**
2. Enter the following values:
1. Name:\*\* Sandbox Zamp API Key\*\*
2. ID:\*\* *\_sandbox\_zmp\_api\_secret*\*\*
1. DO NOT DEVIATE FROM THE ABOVE FORMAT
3. Password: **\Sandbox API Key>**
4. Confirm Password: **\Sandbox API Key>**
5. (Optional) Description: You can choose to enter the first \~10 digits of your API key for future reference
3. Click **Save**
1. Navigate to the **Restrictions** tab of the record and check the following boxes:
1. **Allow for all Scripts**
2. **Allow for all Domains**
# Next Steps
At this point, you are ready to follow the standard tax or SuiteTax configuration process. See the **Zamp SuiteBundle Configuration** section.
This step is likely required if SuiteTax is enabled. For standard users, this is an optional step.
If you are concerned regarding any potential Zamp calculations overriding original tax amounts (very low risk of this), you can set a **Zamp Start Date** which will force Zamp to never override tax amounts before that date
## Setting up Your API Key(s)
### Production
1. Within your global search bar, look for **Setup > Company > API Secrets**
1. Click **Create New**
2. Enter the following values:
1. Name: **Zamp API Key**
2. ID: ***\_zmp\_api\_secret***
1. DO NOT DEVIATE FROM THE ABOVE FORMAT
3. Password: **\**
4. Confirm Password: **\**
5. (Optional) Description: You can choose to enter the first \~10 digits of your API key for future reference
3. Click **Save**
1. Navigate to the **Restrictions** tab of the record and check the following boxes:
1. **Allow for all Scripts**
2. **Allow for all Domains**
### Sandbox
1. Click **Create New**
2. Enter the following values:
1. Name:\*\* Sandbox Zamp API Key\*\*
2. ID:\*\* *\_sandbox\_zmp\_api\_secret*\*\*
1. DO NOT DEVIATE FROM THE ABOVE FORMAT
3. Password: **\Sandbox API Key>**
4. Confirm Password: **\Sandbox API Key>**
5. (Optional) Description: You can choose to enter the first \~10 digits of your API key for future reference
3. Click **Save**
1. Navigate to the **Restrictions** tab of the record and check the following boxes:
1. **Allow for all Scripts**
2. **Allow for all Domains**
# Next Steps
At this point, you are ready to follow the standard tax or SuiteTax configuration process. See the **Zamp SuiteBundle Configuration** section.