> ## Documentation Index
> Fetch the complete documentation index at: https://developer.zamp.com/llms.txt
> Use this file to discover all available pages before exploring further.
# Installation Guide
> Follow this guide to install and configure Zamp in your Checkout Champ account.
# Overview
To accurately calculate sales tax for all of your Checkout Champ transactions, follow this guide to install and configure the Zamp integration.
# Prerequisites
To install the Zamp Plugin, you will need access to:
| **Item** | **Where to Obtain** |
| ------------------------------------------- | ------------------------------------------------------------------------------- |
| Access to the Checkout Champ Admin Tool | Your company's admin |
| Your Zamp API Key for Sandbox or Production | The **Integrations** page within your Zamp account, or your Zamp representative |
# Installation Process
## Installing the Zamp Plugin
[crm.checkoutchamp.com](http://crm.checkoutchamp.com)
 Under **Admin**, click **Plugins**, search for **Zamp**, and click **Activate**
1. Under **apiKey**, enter your sandbox key
2. Under **FriendlyName**, enter as **\ - Sandbox**
3. Check **sendTransactions**
4. Check **calculateShippingTax**
5. Hit **Connect**
## Mapping Products
To accurately calculate tax for your inventory, it is important to map your items to Zamp’s Product Tax Codes.
Zamp’s tax codes can be found [here](https://developer.zamp.com/api/zamp-tax-codes), but talk to your Zamp Representative if you have any questions. We are here to assist in evaluating the taxability of your inventory.
Under **CRM**, click **Products**
1. Within your product, find the **Tax Code** box
2. Enter the applicable Zamp tax code
3. Save with **Update Product**
## Enabling Tax Calculation for Campaigns
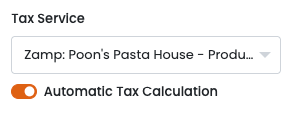
Zamp will appear under **Tax Service** for any campaigns you create.
* Ensure that you’re selecting **Zamp: \ - Production** for any campaigns Tax Service so Zamp calculates tax and posts transactions on your behalf.
* Ensure **Automatic Tax Calculation** is toggled.
There is no action required within the **Sales Tax** options within the campaign you are editing.
Under **Admin**, click **Plugins**, search for **Zamp**, and click **Activate**
1. Under **apiKey**, enter your sandbox key
2. Under **FriendlyName**, enter as **\ - Sandbox**
3. Check **sendTransactions**
4. Check **calculateShippingTax**
5. Hit **Connect**
## Mapping Products
To accurately calculate tax for your inventory, it is important to map your items to Zamp’s Product Tax Codes.
Zamp’s tax codes can be found [here](https://developer.zamp.com/api/zamp-tax-codes), but talk to your Zamp Representative if you have any questions. We are here to assist in evaluating the taxability of your inventory.
Under **CRM**, click **Products**
1. Within your product, find the **Tax Code** box
2. Enter the applicable Zamp tax code
3. Save with **Update Product**
## Enabling Tax Calculation for Campaigns
Zamp will appear under **Tax Service** for any campaigns you create.
* Ensure that you’re selecting **Zamp: \ - Production** for any campaigns Tax Service so Zamp calculates tax and posts transactions on your behalf.
* Ensure **Automatic Tax Calculation** is toggled.
There is no action required within the **Sales Tax** options within the campaign you are editing.